Escalations Tab
The Escalations tab consists of the following elements:
- Search
- Filter
- Escalations table
Escalations Table
The Escalations table contains the following columns:

- Service—shows the name of the service.
- Severity—a categorization of the risk and urgency of an alarm (High, Medium, Low).
- Status—shows status of the escalation.
- Escalation Unique ID—a unique identification number that is generated automatically, once the escalation is created.
- Escalation Name—shows the name of escalation that is taken from the event name.
- Time Created—shows time when the escalation was created.
- Star Value—shows rating that clients provide when closing escalation.
- Feedback Tag—shows the tag selected by the client when marking the escalation as remediated, providing context for their feedback.
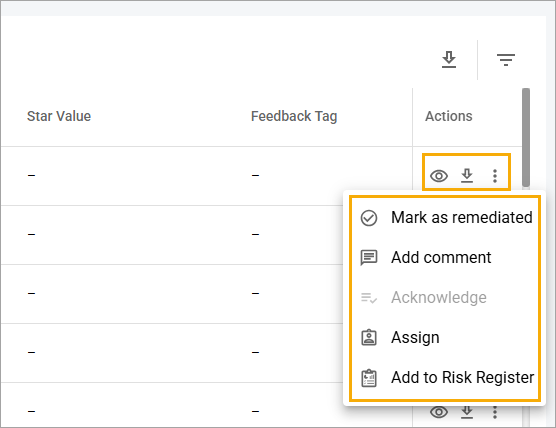
- Actions—contains a detailed information on the escalation. Depending on your permissions, you can perform different actions with escalation.
Additionally, you can apply filters to the escalations and sort them by Severity, Status, Assignment, Time Created, Star Value, Feedback Tags, and Related to a Threat Hunt.
- By default, all escalations are filtered by Time Created. All escalation statuses, except for Closed, are displayed in the list.
To clear all filters, select the Clear Filters button next to the Search field.
Depending on your permissions, you can perform different actions on the escalation, such as:

- View—view the details of the escalation.
- Download—select the checkbox near the escalation you want to download and then select the Download icon in the Actions column.
- Acknowledge—indicates that the user has read and acknowledged the information on escalation.
- Assign—assign the escalation for further approvement.
- Mark as remediated—mark as remediated to resolve the escalation. The status changes to Closed in the Status column.
- Add comment—add comment to the escalation that will be displayed on the Comments tab.
- Add to Risk Register—add escalation to Risk Register.
After you open the escalation details, you can use the Chat with analyst function to address questions or concerns on the escalation received. You’ll also see Chat with analyst in the email notification you receive. For more information, see the Start Chat from Escalation topic.
Search Escalations
To find an escalation, on the Escalations tab, enter at least three characters of the escalation data in the Search field, and then select the Search icon or press the Enter button.
Download Escalations
You have two options to download the escalation:
- Download information about a particular escalation by selecting the Download icon in the Actions column of the table with the list of escalations.
- Download several escalations.
To download several escalations
- In the Escalations table, select the checkboxes near the needed escalations.
- Select the Download Selected button.
- In the Information pop-up window, select the Download button.
Related Topics